
Skip to main content
Search
Meaning of Greetings
I’m going to refer to the greeting (No Answer / Busy) as “message”, to prevent confusion between this and the recording of the user’s name.
- No Answer
- A party calls the extension, and the user doesn’t answer within the Inbound dial timeout (if set, otherwise the tenant default). If this hasn’t been recorded, the server will generate a message using the greeting (if recorded, otherwise the extension number).
- Busy
- A party calls the extension, but the user is currently on a call, or has DND enabled. If this hasn’t been recorded, the server will use the No Answer message.
- Greeting
- The user’s name, to be used in a server-generated message (if Busy / No Answer messages have not been recorded). By default, this is a server-generated recording of the extension number.
Process for Extension Specific Mailbox
- Access the Cloud PBX
- Browse to Configuration → Extensions
- Click the extension you want to modify
- Ensure that the inbound dial timeout is set to your liking, unless the tenant default extension dial timeout has already been customized (unless you want to override this).
- Set Voicemail MWI to Voicemail Same Number

- Under Additional Destinations, set the following (unless you wish to customize further):
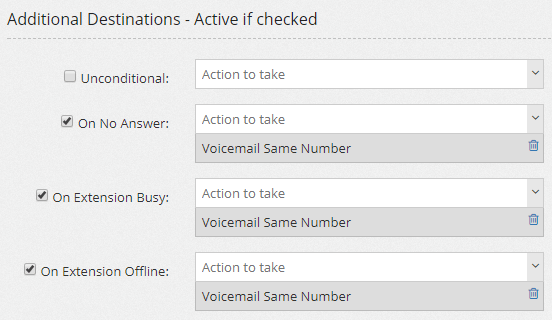
- On No Answer: Voicemail Same Number
- On Extension Busy: Voicemail Same Number
- On Extension Offline: Voicemail Same Number
- Save
- If prompted to refresh extension, please be aware that doing this may refresh the SIP client’s registration, and cause a brief outage.
- Click No for this change to occur on next SIP registration.
- Click the extension you want to modify
- Browse to Configuration → Voicemails
- Click the Mailbox corresponding to the extension that you just modified
- Update the PIN, Name, and Email
- We normally use 1234 as the initial PIN on mailboxes, unless the client requests otherwise
- If you’ve entered an email address, and you want the Cloud PBX to delete the voicemail from the user’s mailbox after emailing it to the user, set Automatic delete to Yes
- Under Greetings, upload any audio files you have
- Save
- Update the PIN, Name, and Email
- Click the Mailbox corresponding to the extension that you just modified
- Done!
Process for Group Mailbox
e.g. Main Voicemail, After Hours Voicemail, or Office Voicemail.
- Access the Cloud PBX
- Browse to Configuration → Voicemails
- Add the Voicemail mailbox
- Mailbox should have no spaces or symbols, e.g. MainVoicemail
- Update the PIN, Name, and Email
- We normally use 1234 as the initial PIN on mailboxes, unless the client requests otherwise
- If you’ve entered an email address, and you want the Cloud PBX to delete the voicemail from the user’s mailbox after emailing it to the user, set Automatic delete to Yes
- Under Greetings, upload any audio files you have
- Save
- Update the PIN, Name, and Email
- Add the Voicemail mailbox
- Done!


Comments are closed.